
screendump
Terminal tool for dumping the screenbuffer from Elektron instruments
About
Highlights
- Single captures or a live view, up to 30 frames per second over USB
- Record while you watch: only frames that changed are kept, with their timing
- Turn recordings into GIFs, and save audio and video if you like
- One Python file, nothing else to set up
What you need
Python with python-rtmidi (sounddevice for audio and ffmpeg for video, only if you want those) and the original Digitakt, connected over USB or MIDI.
Good to know
So far only the Digitakt is implemented; the other Elektron instruments are listed and follow once a screen has been captured from them. Tested on macOS; Linux and Windows are waiting for testers.
README
screendump
See your Elektron instrument's screen in the terminal.
It uses the instrument's own screenshot command over MIDI. Nothing on the instrument is modified — no firmware change, no flashing.
Works on macOS, and awaits testing on Linux and Windows.
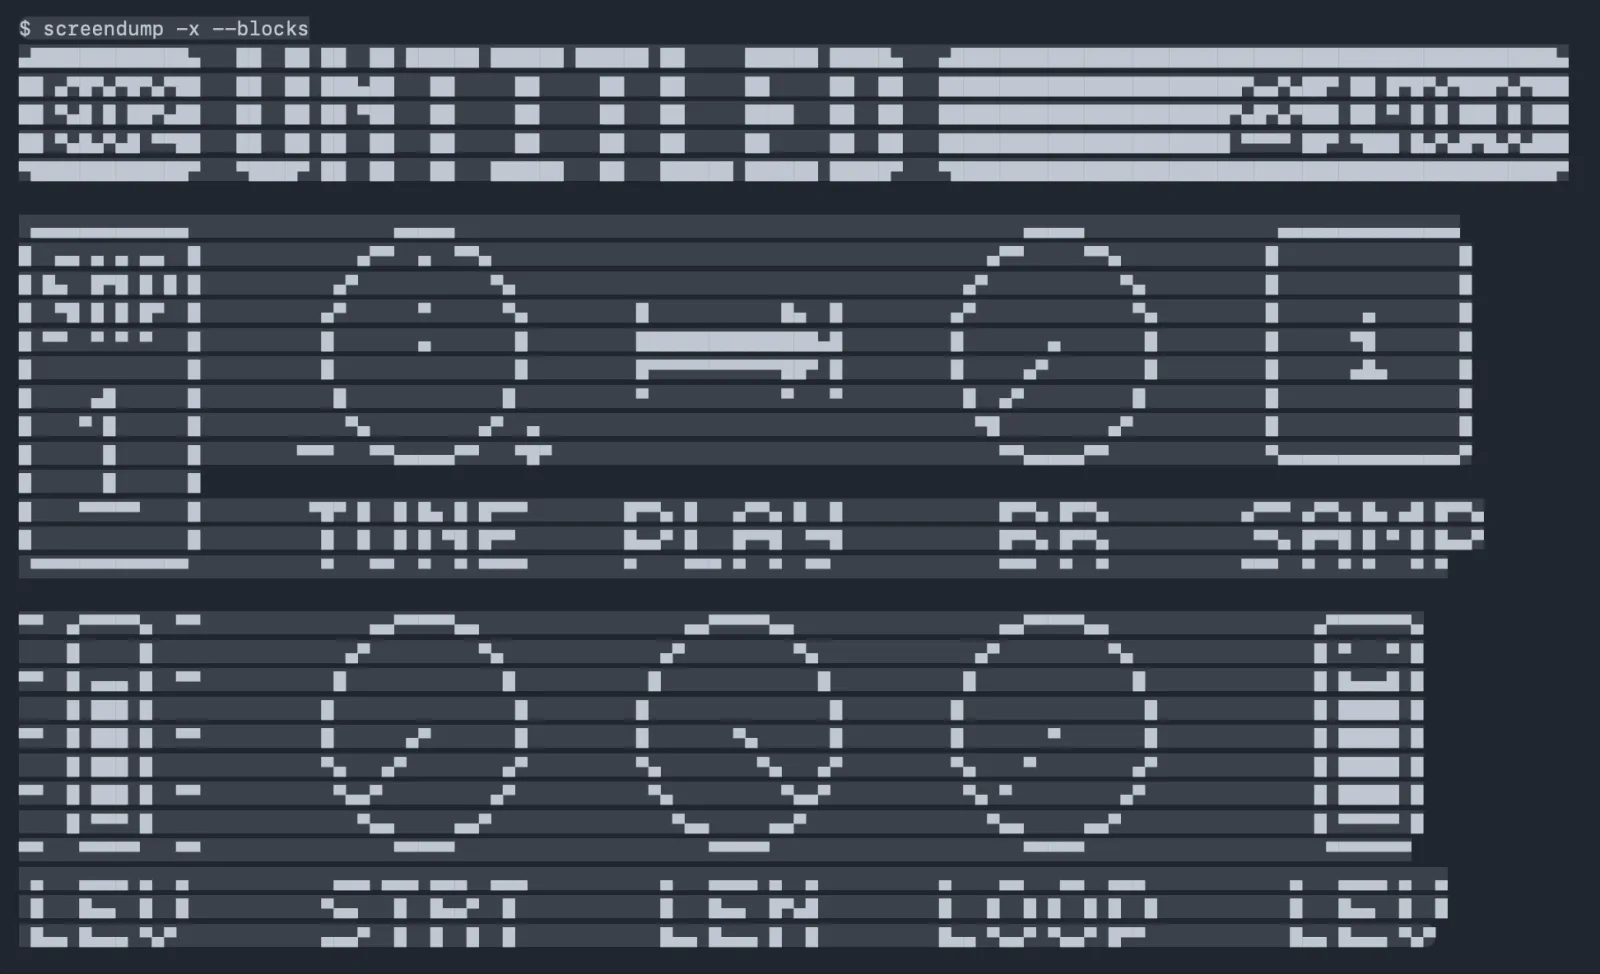
$ screendump -x --blocks
▄█████████████▄   ██  ██ ██  ██ ██████ ██████ ██████ ██     ██████ █████▄   ▄██████████████████████████████████████████████████▄
██ ▄▀█▀▄▀█▀▄▀██   ██  ██ ███▄██   ██     ██     ██   ██     ██     ██  ██   █████████████████████████▀▄▄▀▄██▀ ██ █▀█▀▄▀███▀▄▀███
██ ▀▄█ █ ██▀▄██   ██  ██ ██ ▀██   ██     ██     ██   ██     ████   ██  ██   ████████████████████████▀▄█▀▄▀███ ██ ▀ █ █ ███ █ ███
██ ▀▄█▄▀▄█ ▀▀██   ██  ██ ██  ██   ██     ██     ██   ██     ██     ██  ██   ████████████████████████ ▀▀▀▀ ██▀ ▀███ █▄▀▄█▀█▄▀▄███
▀█████████████▀   ▀████▀ ██  ██   ██   ██████   ██   ██████ ██████ █████▀   ▀██████████████████████████████████████████████████▀

 ▄▄▄▄▄▄▄▄▄▄▄▄▄                 ▄▄▄▄▄                                               ▄▄▄▄▄                ▄▄▄▄▄▄▄▄▄▄▄▄▄▄▄
█  ▄▄ ▄ ▄ ▄▄  █             ▄▀▀  ▄  ▀▀▄                                         ▄▀▀     ▀▀▄            █               █
█ █▄  █▀█ █ █ █           ▄▀           ▀▄                                     ▄▀           ▀▄          █               █
█  ▀█ █ █ █▀  █          ▄▀      ▀      ▀▄         █           █▄  █         ▄▀             ▀▄         █       ▄       █
█ ▀▀  ▀ ▀ ▀   █          █       ▄       █         ███████████████▄█         █       ▄       █         █      ▀█       █
█             █          █               █         █▀▀▀▀▀▀▀▀▀▀▀██▀ █         █     ▄▀        █         █      ▄█▄      █
█     ▄█      █           █             █          ▀           ▀   ▀          █  ▄▀         █          █               █
█    ▀ █      █            ▀▄         ▄▀  ▄                                    ▀█         ▄▀           █               █
█      █      █        ▀▀▀   ▀▀▄▄▄▄▄▀▀   ▀█▀                                     ▀▀▄▄▄▄▄▀▀             ▀▄▄▄▄▄▄▄▄▄▄▄▄▄▄▄▀
█      █      █
█    ▀▀▀▀▀    █         ▀█▀ █  █ █▄ █ █▀▀▀        █▀▀▄ █   ▄▀▀▄ █  █             █▀▀▄ █▀▀▄           ▄▀▀▀ ▄▀▀▄ █▄ ▄█ █▀▀▄
█             █          █  █  █ █ ▀█ █▀▀         █▄▄▀ █   █▀▀█  ▀▀█             █▀▀▄ █▀▀▄            ▀▀▄ █▀▀█ █ ▀ █ █▄▄▀
 ▀▀▀▀▀▀▀▀▀▀▀▀▀           ▀   ▀▀  ▀  ▀ ▀▀▀▀        ▀    ▀▀▀ ▀  ▀  ▀▀              ▀▀▀  ▀  ▀           ▀▀▀  ▀  ▀ ▀   ▀ ▀

▀▀  ▄▀▀▀▀▀▄  ▀▀              ▄▄▀▀▀▀▀▄▄                 ▄▄▀▀▀▀▀▄▄                 ▄▄▀▀▀▀▀▄▄                 ▄▀▀▀▀▀▀▀▄
    █     █                ▄▀         ▀▄             ▄▀         ▀▄             ▄▀         ▀▄               █ ▀   ▀ █
▀▀  █ ▄▄▄ █  ▀▀           █             █           █             █           █             █              █ █▄▄▄█ █
    █ ███ █              █               █         █               █         █               █             █ █████ █
▀▀  █ ███ █  ▀▀          █      ▄▀       █         █       ▀▄      █         █       ▀       █             █ █████ █
    █ ███ █              ▀▄   ▄▀        ▄▀         ▀▄        ▀▄   ▄▀         ▀▄    ▀        ▄▀             █ █████ █
▀▀  █ ███ █  ▀▀           ▀▄▄▀         ▄▀           ▀▄         ▀▄▄▀           ▀▄ ▀         ▄▀              █ █████ █
    █ ▀▀▀ █                 ▀▄▄     ▄▄▀               ▀▄▄     ▄▄▀               ▀▄▄     ▄▄▀                █ ▀▀▀▀▀ █
▀▀   ▀▀▀▀▀   ▀▀                ▀▀▀▀▀                     ▀▀▀▀▀                     ▀▀▀▀▀                    ▀▀▀▀▀▀▀
 ▄   ▄▄▄▄ ▄  ▄            ▄▄▄ ▄▄▄ ▄▄▄  ▄▄▄           ▄   ▄▄▄▄ ▄  ▄          ▄    ▄▄   ▄▄  ▄▄▄            ▄   ▄▄▄▄ ▄  ▄
 █   █▄▄  █  █           ▀▄▄   █  █▄▄▀  █            █   █▄▄  █▀▄█          █   █  █ █  █ █  █           █   █▄▄  █  █
 █▄▄ █▄▄▄ ▀▄▀            ▄▄▄▀  █  █  █  █            █▄▄ █▄▄▄ █  █          █▄▄ ▀▄▄▀ ▀▄▄▀ █▀▀            █▄▄ █▄▄▄ ▀▄▀
A real 128 × 64 screen, unretouched — the Digitakt's SRC page, with LEV,
STRT, LEN, LOOP and LEV under their knobs.
Install
pip install python-rtmidi
screendump is a single file: put it on your PATH and make it executable, or
simply run it from the repo.
That one package is all you need to see a screen. Two more things are needed only if you want sound and video, and each is named when it is missing, so nothing has to be installed up front:
| for | install |
|---|---|
| the screen, recording, GIF | pip install python-rtmidi |
--save-audio |
pip install sounddevice |
--save-video |
ffmpeg — brew install ffmpeg, apt install ffmpeg, winget install ffmpeg |
Find your MIDI ports
$ screendump --list-midi
MIDI inputs (instrument -> computer):
  [0] Elektron Digitakt
MIDI outputs (computer -> instrument):
  [0] Elektron Digitakt
Capture the screen on an attached instrument
$ screendump -x --midi-in 0 --midi-out 0 --instrument dt
-x is the only mode that talks to hardware.
Ports can be given three ways: an index from --list-midi, an instrument short
form (--midi-in dt), or any fragment of the port name (--midi-in MOTU, handy
when the instrument is behind a MIDI interface). A fragment has to identify
exactly one port — if two match, it stops and shows you both rather than
choosing for you.
--instrument currently only knows dt for Digitakt, but will be expanded as more devices are confirmed.
Output goes to stdout, so it pipes and tees like anything else:
$ screendump -x --blocks | tee shot.txt
That keeps one fixed rendering, as characters. To keep the data instead, save the frame and re-open it — the pixels are still there, so you can render them differently afterwards without going back to the instrument:
$ screendump -x --save-syx shot.syx
$ screendump --from-file shot.syx --blocks
$ screendump --from-file shot.syx --ascii --invert
Live view and recording
$ screendump -x --framerate 30
Streams the screen, redrawing in place, until Ctrl+C. Your terminal is left exactly as it was — the live view never enters the scrollback.
The rate is capped at 30, the instrument's own refresh, so asking for more just returns the same frame twice. Over DIN expect about 3.
Over USB, --bench measures a clean 30 fps, while the live view settles nearer
26–27 once it is also drawing and recording. That costs you nothing in accuracy:
every frame is stamped with the moment it arrived, so a recording keeps its real
pacing whether the loop hit 30 or 26.
Since the screen refreshes at roughly 30 Hz, rates that divide into it — 30, 15, 10, about 7 — may sit more evenly against it than one in between, and a rate like 25 can end up slower than either neighbour. Treat that as a rule of thumb rather than exact science: if a recording looks uneven, try the nearest division of 30.
Record while you watch
$ screendump -x --framerate 15 --save-mid cap.mid --save-gif out.gif
                                    ... live view here, Ctrl+C to stop ...
screendump: 255 polled, 101 kept, 18.1 s
screendump: wrote 101 frames to cap.mid
screendump: wrote 101 frames (18.1 s) to out.gif
Only frames that actually changed are kept, each with the length of time it
was on screen — so a still screen costs one frame rather than fifteen a second.
That is the 255 polled, 101 kept above.
Add -H / --hide to record without drawing anything.
Or make the GIF afterwards
$ screendump --from-file cap.mid --save-gif out.gif
A .mid keeps every frame and its timing, so you can come back to a recording
and re-cut it without touching the instrument again.
GIFs and videos are both enlarged four times by default — a 128 × 64 screen
becomes 512 × 256, since the raw size is nearly invisible on a modern display.
--upscale N changes it. Enlarging is nearest-neighbour on purpose: a 1-bit
screen through a smoothing filter turns to mush. It costs little in a GIF, where
4× is about four and a half times the bytes rather than sixteen.
⚠️ Some GIF viewers clamp very short delays, so a fast animation can play back slower than it was captured.
Sound and video
A GIF shows what the instrument is doing. For what it sounds like you need video, which means recording the audio at the same time.
This part needs two things the screen does not — recording audio needs
pip install sounddevice
and writing the video needs ffmpeg on your PATH (brew install ffmpeg,
apt install ffmpeg, winget install ffmpeg). Either one is named by the tool
if it is missing, so you can also just try it and see.
Find the audio input the same way as the MIDI ports:
$ screendump --list-audio
Audio inputs (instrument -> computer):
  [0] MacBook Air Microphone (Core Audio)   1 ch   48000 Hz
  [1] Elektron Digitakt (Core Audio)   2 ch   48000 Hz
--audio-in takes an index, an instrument short form, or any fragment of the
name — exactly like --midi-in. The host API is part of the name because the
same interface is listed once per host API on Windows, so --audio-in "Digitakt (WASAPI)" is a way to pick one when several match.
Record picture and sound together:
$ screendump -x --framerate 30 --audio-in dt \
             --save-mid cap.mid --save-audio cap.wav
Then turn the pair into a video:
$ screendump --from-file cap.mid --from-audio cap.wav --save-video out.mp4
Video takes two inputs, because the two halves are recorded separately: a
.mid holds the picture and its timing, a .wav holds the sound. They line up
without you doing anything — the capture's clock starts at the first audio
sample, so both files share an origin.
Or do it in one go, and skip the intermediate files:
$ screendump -x --framerate 30 --audio-in dt --save-video out.mp4
Encoding is the slow part of a long recording — two minutes at the default size
is around half a gigabyte of raw frames handed to ffmpeg. --upscale 2 quarters
that when you want a quick look rather than something to keep.
⚠️ The first recording will ask for microphone permission on macOS — that is the OS gate on any audio input, including an instrument. If you refuse it, the recording silently comes out empty.
If sound and picture drift apart
Every recording prints what the audio clock actually did:
screendump: audio: 5001216 samples, 104.2 s, 0 overflows
screendump: audio clock: 47999.3 Hz measured vs 48000 Hz nominal (-15 ppm, -2 ms over this capture)
An interface that says 48000 Hz is really a crystal a few tens of parts per million away from that, while the frame times come from the computer's clock. The two disagree slowly, so the figure is measured and printed rather than assumed. That last number is how far the sound has slid against the picture.
The figures above are a real Digitakt over USB: −15 ppm, about a millisecond a minute, so it would take roughly an hour to accumulate 50 ms. In practice this does not matter — but it is measured rather than promised.
0 overflows is the other number to glance at. Anything above zero means
samples were dropped, and the recording is short by that much. A Digitakt
polled at 30 fps for 104 seconds dropped none, so screenshotting the instrument
does not disturb its audio.
If you pair a .wav with a .mid from a different capture, you get told:
screendump: ⚠️ cap.wav is 16.9 s but the recording is 104.2 s -- are they from the same capture?
The video always follows the picture; sound that runs short is padded with silence and sound that runs long is trimmed.
Set it once per session
Each variable takes exactly what its option takes — so the 0s below are port
indices from --list-midi, not "off" or "default", and the instrument can
be written any of its three accepted ways.
$ export SCREENDUMP_MIDI_IN=0             # [0] from --list-midi
$ export SCREENDUMP_MIDI_OUT=0            # [0] from --list-midi
$ export SCREENDUMP_AUDIO_IN=dt           # short form, or an index from --list-audio
$ export SCREENDUMP_INSTRUMENT=Digitakt   # or DT, or dt -- all three work

$ screendump -x
An option always beats the environment. Setting variables differs by shell:
| shell | |
|---|---|
| sh / bash / zsh | export SCREENDUMP_MIDI_IN=0 |
| PowerShell | $env:SCREENDUMP_MIDI_IN = "0" |
| cmd.exe | set SCREENDUMP_MIDI_IN=0 |
Options
-x, --external |
capture from the instrument |
--list-midi |
list MIDI ports |
--list-audio |
list audio inputs |
--midi-in, --midi-out |
port index or name fragment |
--audio-in |
audio input index or name fragment |
--instrument |
which machine — required, no default |
--blocks |
half-block rendering, no row gaps |
--ascii |
full resolution, one character per pixel |
--invert, --flip |
swap lit/unlit, flip vertically |
--framerate N |
with -x, stream until Ctrl+C (capped at 30); also the frame rate of a video |
-H, --hide |
while streaming, don't draw to the terminal |
--save-syx PATH |
also save the frame |
--save-raw PATH |
also save just the pixel bytes |
--save-mid PATH |
also save the recording, with timing, as a MIDI file |
--save-gif PATH |
also save an animated GIF |
--save-audio PATH |
also record the instrument's audio to a stereo WAV |
--save-video PATH |
write an mp4 of picture and sound together |
--upscale N |
enlarge each pixel to N × N in a GIF or video (default 4) |
--from-file PATH |
render a saved .syx, .mid or raw dump instead |
--from-audio PATH |
the .wav to pair with --from-file for a video |
--bench N |
measure the frame rate over N captures |
--self-test |
check the tool without an instrument |
--timeout |
reply timeout in seconds, default 2 |
Nothing is written to disk unless you ask.
If braille looks gappy
The default rendering uses braille, which is compact but shows seams between rows in many terminals, because braille dots sit inset in the character cell.
Use --blocks. It fills the cell edge to edge and always looks solid.
To keep braille instead, reduce your terminal's line spacing:
| terminal | setting |
|---|---|
| iTerm2 | Profiles → Text → Vertical Spacing → 100 % or below |
| Ghostty | adjust-cell-height = -8% |
| kitty | modify_font cell_height -2px |
| WezTerm | line_height = 1.0 |
| Terminal.app | not adjustable — use --blocks |
Iosevka and JuliaMono draw tight braille; SF Mono and Menlo are heavily padded.
Instruments
--instrument is spelled exactly — the short form, its lowercase form, or the
full name. digitakt and DigiTAKT are rejected on purpose: the instrument
decides what goes on the wire, so a typo should be an error rather than a guess.
Implemented
DT |
dt |
Digitakt |
Known, not implemented
DTII |
dtii |
"Digitakt II" |
DN |
dn |
Digitone |
DNII |
dnii |
"Digitone II" |
ST |
st |
Syntakt |
AR |
ar |
"Analog Rytm" |
A4 |
a4 |
"Analog Four" |
AH |
ah |
"Analog Heat" |
M:S |
m:s |
Model:Samples |
M:C |
m:c |
Model:Cycles |
OT |
ot |
Octatrack |
MD |
md |
Machinedrum |
Asking for one of these stops with "The Octatrack is not implemented for screendump yet". That is not caution — no instrument id is known for it, so there is no request to send.
Names containing a space need quoting: --instrument "Digitakt II". The short
forms never do, which is the easier habit.
An instrument moves to the implemented list once a screen has been captured from it and read. Adding one is a few lines — see the notes at the top of the script.
Pictures in the README load from GitHub.
- Language
- Python
- License
- MIT License
- Stars
- 8
- Forks
- 2
- Created
- 09-19-2026
- Last commit
- 2 weeks ago
Added by Neutron on Yesterday · Last edited by Neutron, 16 hours ago · History (2 versions)